Guide
From unboxing to pushing your first macro — everything you need to know.
Contents
Setup
2. Flash Firmware
3. Connect & Configure
4. Wired Mode Setup (alternative to Bluetooth)
5. Pair via Bluetooth
6. Use It
Features
7. Action Types
8. Layouts, Export & Import
9. Screensaver & Widgets
10. Automations
11. WiFi Setup
Maintenance
12. Firmware Updates
13. Factory Reset
Troubleshooting
14. Common Issues
Reference
15. Limits & Specs
Setup
1
Buy or Build
Buy one pre-assembled — R1,099 shipped in SA. You get the device in a 3D-printed enclosure, a USB-C cable, and the latest firmware pre-flashed. Available for free local pickup in Newcastle KZN.
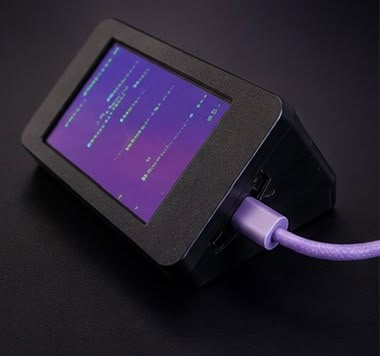
Or build your own — source the parts and assemble it yourself:
- CYD: E32R28T from Robotics.org.za (R342.70 incl VAT) — or any ESP32-2432S028R / "Cheap Yellow Display". The E32R28T is pin-compatible with the standard CYD and works with all SudoDeck firmware
- Enclosure: 3D-printed shell — from NDE3D ~R170, or print your own from the open-source STL files
- USB cable: Any USB-C data cable (charge-only cables won't work for serial/flashing)
Total DIY cost: ~R515 + your time. Assembly takes about 10 minutes — slide the CYD into the enclosure, plug in the USB, done.
E32R28T and standard CYD (ESP32-2432S028R) use the same pins, same TFT driver, same touch controller. All firmware, config, and accessories are fully interchangeable.
2
Flash the Firmware
If you bought a pre-assembled SudoDeck, the latest firmware is already installed — skip to step 3.
For DIY builds: your CYD comes with factory demo software. You need to replace it with SudoDeck by putting the board into flash mode:
- Plug the CYD into your computer via USB
- Hold the BOOT button (GPIO0, top-left edge of the board)
- While holding BOOT, tap RESET (EN, top-right edge) — the screen goes blank
- Release BOOT — the CYD is now in download mode, waiting for firmware
- On the Configure page, click Connect for Flashing and select the CYD's serial port in the browser dialog
- Choose your firmware variant — Standard (BLE) for Bluetooth or Wired (Serial) for USB keystroke injection — then pick a version and click Flash
- Wait for the progress bar to reach 100% — the CYD reboots automatically and boots into SudoDeck
The flash process writes to the app partition only — the bootloader is in a protected region and can't be damaged by a bad flash. If something goes wrong, just flash again. Use Backup Firmware to dump the entire 4MB flash for safekeeping before updating.
3
Connect & Configure
Once flashed, the CYD boots into SudoDeck. The display shows a grid of buttons (default 4×3) and a status bar. Leave it plugged into USB — this provides both power and a serial data connection to the config tool.
- Open the Configure page in Chrome or Edge (Web Serial is not supported in Firefox or Safari)
- Click Connect — your browser will show a list of serial devices. Select "USB Serial Device" or "CP2102/CH340" (the CYD's USB-serial chip)
- Once connected, the badge switches from red DISCONNECTED to green CONNECTED
- Click Read to pull the current layout from the device into the browser
- Edit pages, place buttons, pick colors, and assign actions
- Click Write to save your layout to the CYD's flash memory
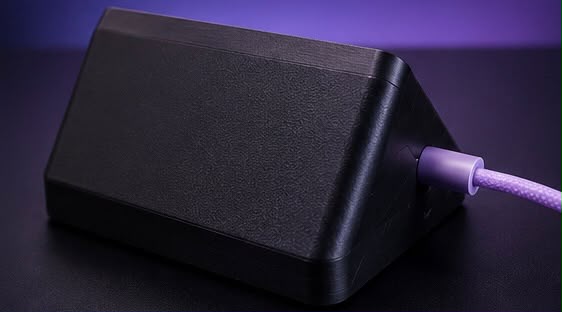
The reset button (small hole) and USB-C port are on the back. The BOOT button is on the top edge inside the enclosure.
Go to ConfigureThe config is saved to the device's SPIFFS partition — it persists across reboots and USB disconnects. Move the CYD to another computer and your layout is still there. Export a .json backup to be safe. The config is only erased when you flash new firmware over the full flash.
4
Wired Mode Setup ADVANCED
Instead of Bluetooth, you can use the CYD as a wired keyboard over USB. The CYD sends keystrokes over the serial connection, and a companion daemon (installed on your computer) injects them as if they came from a physical USB keyboard.
Choose this if your computer doesn't have Bluetooth, you want lower latency, or you prefer a single-cable setup.
Wired mode is for advanced users. It requires installing and running a background daemon on your computer. If you just want a plug-and-play Bluetooth keyboard, stick with the Standard (BLE) firmware.
1. Flash the Wired Firmware
You need the wired firmware variant on the CYD:
- Put the CYD in flash mode (hold BOOT, tap RESET, release BOOT)
- Open the Firmware Tool
- Click Connect for Flashing and select the CYD's serial port
- Select the Wired (Serial) variant using the radio buttons
- Pick the latest wired firmware version from the dropdown and click Flash
- Wait for the progress bar to reach 100% — the CYD reboots automatically
The wired and BLE firmware are separate builds. You can switch between them at any time by re-flashing the other variant. Your config is preserved in SPIFFS and works with both firmware types.
2. Install the Daemon
The daemon is a small background program that reads keystrokes from the CYD over USB and injects them into your OS.
Linux
# Download the latest release
curl -L -o sudodeckd https://github.com/sudobreakstuff/sudodeck/releases/latest/download/sudodeckd-linux-amd64
chmod +x sudodeckd

# Run it (stays open, Ctrl+C to stop)
./sudodeckd

# Install as a systemd user service (auto-start on login)
./sudodeckd --install
Windows
# Run as Administrator (required for SendInput API)
sudodeckd-windows-amd64.exe

# Install as a Windows service (auto-start on boot, run as Administrator)
sudodeckd-windows-amd64.exe --install
macOS
chmod +x sudodeckd-darwin-*

# Run it (foreground)
./sudodeckd-darwin-*

# Install as a LaunchAgent (auto-start on login)
./sudodeckd-darwin-* --install
macOS will ask for Accessibility permission on first run — grant it in System Settings → Privacy & Security → Accessibility. Without it, keystroke injection is blocked.
3. Plug and Play
- Plug the CYD into USB — the daemon auto-discovers it within 5 seconds
- The daemon logs show
Device found: /dev/ttyUSB0 (SudoDeck)or similar - Tap any button on the CYD — the keystroke is injected into your OS immediately
- The CYD's header shows USB instead of a Bluetooth icon, confirming wired mode is active
Configuring the CYD
You can still use the config tool to edit buttons while the daemon is running. The tool automatically coordinates with the daemon:
- Open the Configure page as normal
- Click Connect — the config tool tells the daemon to release the serial port first
- Read, edit, and write your layout as usual
- When you disconnect from the config tool, the daemon picks up the port again automatically
The daemon serves an HTTP API on
127.0.0.1:8092. The config tool calls POST /release before connecting via Web Serial, and the daemon reconnects after the port is released. No manual intervention needed.5
Pair via Bluetooth
Skip this step if you're using Wired Mode — wired and BLE are mutually exclusive. The CYD runs one firmware at a time.
The CYD announces itself as a Bluetooth keyboard. Pair it with your computer, phone, or tablet just like any other Bluetooth device.
- Keep the CYD powered (USB plugged in) — there is no battery, it needs USB power to run
- Open Bluetooth settings on your target device
- Look for SudoDeck in the list of available devices and select it to pair
- Some devices will show a confirmation code — confirm it
- Once paired, the CYD's header shows a Bluetooth icon (macOS/iOS) or "BT" text (Windows/Android/Linux)
Pairing is stored on both sides — you only need to do it once. The CYD will auto-reconnect whenever it's in range and powered on.
Bluetooth Details
- Range: ~10 metres (33 feet) open air, less through walls
- Reconnection: automatic — when the CYD powers on and the paired device is in range, it connects within a few seconds
- Single device: BLE HID can only be connected to one device at a time. To switch devices, unpair from the current one and pair with the new one
- Standard HID: no drivers, no software, no configuration needed. Your OS sees it as a regular Bluetooth keyboard and mouse (keyboard only in the current firmware)
- Connection indicator: top-left of the CYD display — Bluetooth icon (Apple-style) when paired to macOS/iOS, "BT" text for anything else. No icon means BLE is initializing or failed
If the CYD has been paired to a device before and you want to pair it to a different one, you may need to "forget" the CYD in the old device's Bluetooth settings first. BLE only remembers one paired host at a time.
6
Use It
Once paired, every button press on the CYD sends the assigned action to the connected device — just like pressing keys on a keyboard.
Display Overview
- Top bar (status): shows Bluetooth connection icon, WiFi status, and current time. The bar is dark teal
- Grid area: your configured buttons, each with a background color and label. Buttons are rounded rectangles with the label centered
- Bottom bar (navigation): < and > arrows to move between pages. The center shows the current page name and a counter like 3/12
How Buttons Work
- Tap a button on the touchscreen — it flashes briefly (highlight color) then fires the action
- Labels longer than the button width are truncated with ... automatically — keep labels short (under ~12 characters for 4-column layouts)
- Empty buttons (no label, no action) appear dark and do nothing when tapped
Page Navigation
- Tap < (bottom-left) to go to the previous page
- Tap > (bottom-right) to go to the next page
- The page counter in the bottom bar shows your current position, e.g. 5/18
- The page name is editable in the config tool (double-click the page tab)
Display Sleep
- After the screensaver timeout (default 30s, configurable 5-600s), the screensaver activates
- After the sleep timeout (default 60s, configurable 0-600s, 0=off), the display backlight turns off entirely to save power
- Tap the touchscreen anywhere to wake from screensaver or sleep — the grid reappears instantly
- Sleep only affects the display — Bluetooth stays connected and buttons still work if pressed (but you can't see them until you wake the screen)
The CYD has no battery. It must remain plugged into USB to function. Power draw is roughly 200-300mA depending on screen brightness — a standard phone charger or laptop USB port works fine.
Features
7
Action Types
Each button can be assigned one of six action types. Here's what they do and when to use them:
| Action | What it does | Example | Use case |
|---|---|---|---|
| Single Key | Presses and releases one key | ENTER, F5, MEDIA_PLAY_PAUSE |
Media controls, function keys, shortcuts like ESC |
| Key Combo | One or more modifiers + one key | CTRL+C, ALT+TAB, CTRL+SHIFT+ESC |
Keyboard shortcuts, app commands |
| Text String | Types a string of text character by character | hello@email.com |
Login details, canned responses, code snippets |
| Macro | A sequence of steps — each step can be a key, combo, text string, or delay | CTRL+ALT+T → wait 500ms → type htop → ENTER |
Complex multi-step workflows, automation sequences |
| App Launcher | Opens the OS search/run dialog, types the app name, and presses Enter | Windows → Calculator, macOS → Spotify |
Launch applications hands-free from your deck |
| Delay | Waits a specified time (1-10000ms) before the next action — primarily used inside macros | 500ms |
Waiting for apps to open, page transitions |
Key Name Reference
Use these exact key names in the config tool:
Letters & Numbers
a through z, 0 through 9
Function Keys
F1 through F24
Navigation
UP, DOWN, LEFT, RIGHT, PAGE_UP, PAGE_DOWN, HOME, END
System
ENTER, TAB, ESC, BACKSPACE, DELETE, INSERT, SPACE, CAPS_LOCK, PRINT_SCREEN
Media Keys
MEDIA_PLAY_PAUSE, MEDIA_NEXT_TRACK, MEDIA_PREV_TRACK, MEDIA_MUTE, MEDIA_VOLUME_UP, MEDIA_VOLUME_DOWN, MEDIA_STOP
Brightness & Lock
BRIGHTNESS_UP, BRIGHTNESS_DOWN, LOCK_SCREEN
Modifier Keys (for Combos)
Available modifiers: CTRL, ALT, SHIFT, GUI (Windows key / Cmd), and combinations like CTRL_SHIFT, CTRL_ALT, CTRL_ALT_SHIFT, etc.
Macro Tips
- Macros execute each step sequentially. There is no hard step limit, but very long macros (>50 steps) may take several seconds to run
- Use Delay steps to wait for UI elements to appear before typing or pressing keys
- Example: open Task Manager:
CTRL+SHIFT+ESC→ delay 1000ms →ALT+T(focus details) - Macro steps are edited in the config tool's action panel — add, remove, and reorder steps freely
App Launcher Notes
The App Launcher uses the OS search function:
Windows → Win key → type app name → Enter
macOS → Cmd+Space (Spotlight) → type app name → Enter
Linux → Super key (GNOME/KDE) → type app name → Enter
Use the exact display name of the app (e.g. "Visual Studio Code" not "code"). The paired device must be at its desktop or home screen — the launcher types into the OS search, not an already-open dialog.
The App Launcher types into the native OS search — NOT the Windows "Run" dialog (Win+R). This means you launch apps the same way as typing in the Start Menu / Spotlight. Faster and more reliable.
8
Layouts: Pages, Grid & Backup
Your button layout is organised as a grid of pages. Each page has a configurable number of columns and rows, and each cell holds one button with a label, color, and action.
Layout Controls
Found at the bottom of the config tool:
- Columns: 1 to 6 (default 4)
- Rows: 1 to 5 (default 3)
- Pages: 1 to 18 (default 3)
Click Apply Layout to resize. Existing button data is preserved — when you shrink the grid (e.g. 4×3 → 3×2), extra buttons remain in memory and reappear if you expand again. No content is lost.
Page Tabs
- Page tabs run across the top of the grid area in the config tool
- Click a tab to switch to that page for editing
- Double-click a tab to rename the page
Editing a Button
- Click any button in the grid to select it — it highlights with a border
- The Edit Button panel opens below the grid
- Set the label (displayed on the CYD), color (hex value, or use the color picker), and action type with its parameters
- Click Apply to save changes to the current button, or Cancel to discard
Export, Import & Share
The config tool supports exporting and importing your entire layout as a JSON file. The buttons are at the top of the config section:
- Export — downloads a
.jsonfile with your full layout (all pages, buttons, colors, actions, WiFi, and screensaver settings) - Import — loads a previously exported
.jsonfile back into the config tool. After importing, you must still click Write to send it to the device - Share — exported JSON files can be sent to other SudoDeck users. They import the file and write it to their device. Build a library of layouts for different workflows
The JSON file contains your WiFi SSID and password in plain text if configured. Be careful when sharing exported configs — clear the WiFi fields first, or share them only with people you trust.
9
Screensaver & Live Widgets
When idle, the CYD displays a screensaver. Three modes are built in:
- Matrix Rain — falling green characters across the display. No WiFi needed. Classic look, runs entirely on-device
- F1 Standings — live Formula 1 race calendar, driver standings, and constructor standings — cycles through three views. Requires WiFi
- Custom Widgets — user-defined API endpoints displayed as live data cards that cycle every 10 seconds. Requires WiFi
Configure screensaver timeout, sleep timeout, and mode in the Screensaver section at the bottom of the config tool. Click Set to apply changes (then Write to save to the device).
Custom Widgets
Add one or more widget sources below the Screensaver section. Each widget has these fields:
| Field | What it does |
|---|---|
| Label | Name shown above the value on the CYD display |
| URL | Any JSON API endpoint (must return valid JSON, no custom auth headers supported) |
| Path | Dot-notation JSON path to extract the value, e.g. btc.usd or current_weather.temperature. Array access with [index] is supported |
| Format | Display template with {value} placeholder, e.g. ${value} or {value}°C |
| Interval | Seconds between data refreshes (30s minimum recommended, max 600s) |
Use the Test button on each widget to verify your URL and path before writing to the device. Widgets cycle every 10 seconds on the CYD display.
Widget Examples
Bitcoin price
URL:
Path:
URL:
https://api.coingecko.com/api/v3/simple/price?ids=bitcoin&vs_currencies=usdPath:
bitcoin.usd Format: ${value}
Temperature (Newcastle, SA)
URL:
Path:
URL:
https://api.open-meteo.com/v1/forecast?latitude=-28.73&longitude=24.77¤t_weather=truePath:
current_weather.temperature Format: {value}°C
Widgets only fetch when WiFi is configured and connected. No API keys are required for the built-in F1 data (Jolpica API) or Open-Meteo weather. You can have up to 8 custom widgets configured at once.
10
Automations
Automations let you send keystrokes or sequences on a timer or schedule — no button press needed. Configure them in the app under the Automations panel.
Types
- Timer — runs an action every N seconds (e.g. press F5 every 10s to refresh a dashboard)
- Schedule — runs an action at a specific time (HH:MM) on selected days of the week (1=Sunday, 7=Saturday)
Enable / Disable
- Per-automation — each automation has an ON/OFF toggle button in its card in the Automations panel. Disabled automations are skipped.
- From the CYD — assign any button the Auto Toggle action type (in the button editor), then pick which automation it controls. The button shows green when the automation is ON and red when OFF. Tap it to toggle.
Actions
Each automation runs one action (key, combo, text, delay, or app launch) — the same set of action types available for buttons.
Automations only fire when enabled. Deleting an automation from the list does not affect button configurations that reference it — those buttons will have no effect until you reassign them.
11
WiFi Setup
WiFi is optional but required for live data features (F1 standings, custom widgets). The CYD uses the ESP32's built-in 2.4GHz WiFi.
Configuration
- In the config tool, enter your SSID and password in the fields below the layout controls
- Click Write to save the layout to the device — WiFi credentials are saved as part of the config
- On the next boot, the CYD attempts to connect to the WiFi network automatically
- Connection status appears in the top-right of the CYD's display header
Status Indicators
- Connected — WiFi icon (arcs) shown in the header
- Connecting — shows "W:connecting"
- Failed — shows "W:OFF" with an error reason code (seen in the header after a failed attempt)
- No WiFi configured — header shows nothing related to WiFi
Important Notes
- 2.4GHz only — the ESP32 does not support 5GHz WiFi networks. Make sure your router isn't hiding the 2.4GHz band
- Auto-reconnect — the CYD retries connection every 30 seconds if the connection drops
- Special characters in SSID or password — most work, but very unusual characters (non-ASCII, emoji) may cause issues over the serial connection
- WiFi credentials are stored in the config JSON on the device's SPIFFS — they persist across reboots
- Flashing new firmware erases everything — save a copy of your config with Export
WiFi on the CYD is not required for normal BLE keyboard operation. It's only needed for F1 standings and custom widgets. If you never use those features, leave WiFi blank.
12
Firmware Updates
Updating the firmware is the same process as the initial flash. The firmware tool on the Configure page handles everything.
- First, Export your current layout from the config tool (Config section) — flashing erases it
- Put the CYD in flash mode (hold BOOT, tap RESET, release BOOT)
- On the Configure page, click Connect for Flashing
- Select the new version from the dropdown and click Flash
- Wait for the progress bar to complete — the CYD reboots automatically
- Reconnect via WebSerial (Connect → Read should show a default layout)
- Import your exported .json backup, then Write it to the device
Full Flash Backup
The Backup Firmware button reads the entire 4MB flash and saves it as a .bin file. This captures both the firmware and your config. To restore it, use the Custom .bin option in the flash tool and select your backup file. This is useful if you want to revert to a previous firmware without re-configuring everything.
Firmware updates overwrite the entire app partition. Your config (stored in the SPIFFS partition) is also erased. Always export your .json config before flashing. The bootloader partition is protected — you can't brick the CYD with a bad flash, just flash again.
13
Factory Reset
Two ways to reset the device to its default 3-page layout (Main, Media, Studio):
Method 1 — Config tool Reset button: Click the red Reset button in the config tool. If connected via WebSerial, it sends a factory reset command to the device (clears the config, resets screensaver settings). Then it reads the fresh default config back into the browser. If not connected, it resets the browser's config to defaults only.
Method 2 — Re-flash firmware: Flashing the firmware .bin at address 0 overwrites the entire flash including the SPIFFS config partition. This gives you a completely clean slate — fresh firmware, default config.
The default layout: 3 pages (Main, Media, Studio), 4×3 grid (12 buttons), each pre-filled with common shortcuts like Copy, Paste, Undo, Play/Pause, Next Track, and volume controls.
Troubleshooting
14
Common Issues
"Could not load firmware list" in the firmware tool
The firmware manifest file couldn't be loaded. Hard-refresh the page (Ctrl+F5 or Cmd+Shift+R) to clear the browser cache. If it persists, open the browser console (F12 > Console tab) and look for the specific error — usually a network or JSON parsing issue.
CYD not detected / serial port not showing up
- You must use Chrome or Edge (Web Serial API is not supported in Firefox, Safari, or older browsers)
- The page must be served over HTTPS (or localhost) — HTTP pages can't access Web Serial. GitHub Pages works
- Check your USB cable — some cables are charge-only and don't carry data. Try the cable that came with the CYD or a known-good data cable
- Try a different USB port, preferably directly on the computer motherboard (not a hub)
- If the CYD lights up but isn't detected, the USB-serial driver (CH340/CP2102) may be missing. Windows usually auto-installs it; on Linux it's built-in; on macOS you may need a driver
- Restart the browser after plugging in the CYD — sometimes the port list doesn't refresh
BLE won't pair / "SudoDeck" not found in Bluetooth list
- Make sure the CYD is powered (USB plugged in) — no power = no Bluetooth
- Check the top-left of the display — you should see a Bluetooth icon (Apple-style for macOS/iOS) or "BT" text (Windows/Android/Linux)
- If the header shows no Bluetooth indicator, the BLE stack may not have started. Reboot the CYD by tapping the RESET button on the back
- If the CYD was previously paired to another device, it may not be discoverable. Unpair from the old device or forget the CYD in the old device's Bluetooth settings first
- On Windows: go to Settings > Bluetooth & other devices > Remove the CYD if listed, then click "Add Bluetooth or other device" and look for SudoDeck again
- BLE range is ~10 metres. Make sure the CYD is close to the device you're pairing with
- Some devices (especially older ones) may need Bluetooth off/on toggled between pairing attempts
- The CYD supports BLE (Bluetooth Low Energy) only. Your computer/phone/tablet must support BLE — virtually all devices from 2016+ do
Config write fails: "IncompleteInput", "HTTP 404", or "oom"
- "IncompleteInput" usually means the JSON config was too large for the serial buffer. Update to firmware v2.1.5+ which has a 128KB buffer — enough for all 18 pages
- "HTTP 404" in the firmware tool means the firmware manifest URL is incorrect. Hard-refresh the page
- "oom" (out of memory) means the JSON payload exceeded the ESP32's available heap. Reduce the number of pages or buttons, or remove long labels/widget URLs
- If the firmware dropdown doesn't show v2.1.5+, hard-refresh the page to clear cache
Buttons don't do anything when pressed
- Check if the CYD is paired to your device — look for the Bluetooth icon/BT text in the display header. No icon = not connected
- Verify the button has an actual action assigned in the config tool (not just a label with no action type)
- Make sure the action type matches what you want — e.g. "Text String" won't trigger a keyboard shortcut
- Reboot the CYD and re-pair if needed
- Test with a simple action: set a button to
Single Key → ENTERand see if it fires - If the button flashes on press but nothing happens, the BLE connection may be active but the HID report isn't reaching the OS. Unpair and re-pair
Screen is blank / won't turn on
- If the USB is plugged in but the screen is off, tap the display — it may be in sleep mode
- If still blank, the firmware may be corrupted or missing. Re-flash the firmware (the bootloader can't be bricked — you can always flash again)
- Make sure the CYD is getting power — the backlight should glow even without firmware
- If the CYD doesn't respond to BOOT+RESET for flash mode, try a different USB cable or port
- As a last resort, momentarily short the EN pin to GND with a wire to force a hardware reset
WiFi won't connect / "W:connecting" stays forever
- The ESP32 only supports 2.4GHz networks — check that your router isn't hiding the 2.4GHz band (many modern routers combine 2.4GHz and 5GHz under one SSID)
- Double-check the SSID and password — the config tool doesn't validate them, and typos are common
- Avoid unusual special characters in the password. ASCII characters are most reliable over the serial connection
- The CYD retries connection every 30 seconds. Wait at least 2 minutes before assuming it won't connect
- The WiFi module is disabled when BT is connected to save power — they share the same radio
Touchscreen is inaccurate or unresponsive
- The CYD uses a resistive touchscreen — it requires firm press, not a light tap like a phone
- Use your fingernail or a stylus for more precision. Resistive screens detect pressure, not capacitance
- If touch stops working, reboot the CYD
Daemon not detecting the CYD
- Make sure you flashed the Wired (Serial) firmware variant — the BLE firmware doesn't send HID packets over serial
- On Linux, add your user to the
dialoutgroup:sudo usermod -a -G dialout $USER— log out and back in - On Linux,
/dev/uinputrequires write permission:sudo usermod -a -G input $USER - On Windows, run the daemon as Administrator — SendInput requires elevated privileges
- On macOS, approve Accessibility permission in System Settings > Privacy & Security
- Check that no other program (Arduino IDE, serial monitor) has the CYD's port open
- The daemon auto-detects the CYD within 5 seconds of plugging it in. If it doesn't, restart the daemon
Keystrokes arrive doubled or not at all
- The daemon and firmware communicate over the same serial port as the config tool. If you have both open, close the config tool (Web Serial) — the daemon will reconnect
- If keystrokes are doubled, the daemon may be running twice. Check for another instance and kill it
- Restart the daemon: stop it (Ctrl+C) and start it again. The daemon re-scans all serial ports on startup
Display shows garbled / corrupted graphics
- This can happen if the TFT SPI frequency is too high for your specific CYD unit. Try a different firmware version or re-flash
- Poor USB power (long cable, hub without external power) can cause display glitches — plug directly into the computer
- Reboot the CYD — a temporary glitch is usually fixed by a reset
Still stuck? Open an issue on GitHub or email shahidsingh1zn@gmail.com. Include details: CYD model, firmware version, what you were doing, and what error you saw.
Reference
15
Limits & Specifications
Layout Limits
| Limit | Value |
|---|---|
| Pages | 18 |
| Columns per page | 1–6 |
| Rows per page | 1–5 |
| Buttons per page | 30 (6×5 max) |
| Total buttons (all pages) | 540 (18 × 30) |
| Custom widgets | 8 max |
| Automations | 20 max |
Hardware Specifications
| Component | Specification |
|---|---|
| SoC | ESP32-D0WD-V3, dual-core Xtensa LX6 @ 240MHz |
| SRAM | 520KB total (~320KB usable after system reserve) |
| Flash | 4MB SPI flash (2MB app + 2MB SPIFFS data) |
| Display | 2.8" TFT LCD, 320×240 pixels, ILI9341 driver, SPI |
| Dimensions | 8.5cm × 5cm × 3.3cm (with enclosure) |
| Touch | Resistive touchscreen, XPT2046 controller, SPI |
| Bluetooth | BLE 4.2 (Bluetooth Low Energy), HID keyboard profile |
| WiFi | 802.11 b/g/n, 2.4GHz only |
| USB | USB-C (USB 2.0 data + power, no alt-mode/PD) |
| USB-serial | CH340C or CP2102 (depending on CYD batch) |
| Power | 5V USB, ~200-300mA draw |
| Battery | None — USB power only. No charging circuit, no battery connector |
| MAC address | Unique per device (printed in firmware info response) |
Software Limits
| Limit | Value |
|---|---|
| Button label length | Truncated with "..." at display width (~12 chars on 4-col grid) |
| Macro steps | No hard limit — practical max ~50 before execution time becomes noticeable |
| Text string length | No hard limit — practical max ~200 chars per button |
| Delay range | 1–10000 milliseconds |
| Screensaver timeout | 5–600 seconds (configurable) |
| Sleep timeout | 0–600 seconds (0 = never sleep) |
| Serial buffer (v2.1.5+) | 131072 bytes (128KB) — enough for full config of all 18 pages |
| BLE range | ~10m open air |
Compatibility
| OS / Platform | BLE HID Support | Daemon (Wired) Support | Web Serial Support |
|---|---|---|---|
| Windows 10+ | Yes | Yes (SendInput) | Yes (Chrome/Edge) |
| macOS 11+ | Yes | Yes (CGEvent, needs Accessibility) | Yes (Chrome/Edge) |
| Linux (BlueZ) | Yes | Yes (/dev/uinput) | Yes (Chrome/Edge) |
| Android 8+ | Yes | No | Yes (Chrome) |
| iOS / iPadOS 13+ | Yes | No | No (Safari only, no Web Serial) |
| ChromeOS | Yes | No (Linux VM may work) | Yes |
Limits are enforced by the firmware at
firmware.ino:298. The web config tool also caps inputs — entering a value above the max is silently clamped. All limits are open-source and changeable in the source code if you need something different.